Showing posts with label how to. Show all posts

Thursday, May 1, 2014

Modern Mother's Day Cake


Make Mom something special - something she will remember.  This modern Mother's Day cake features a sophisticated houndstooth pattern created with my new houndstooth cutter set from my Flourishes line.  It's adorned with fabulous sugarpaste poppies - also made with my new life-sized poppy cutters.

Want to know how it was done?  Here is a quick tutorial for you to learn & share! Enjoy


All supplies for this project can be found at our store www.flourconfections.com 
You will need:
Variety of Petal Dusts: Red Velvet, Red Rose & Poppy
Gum Glue & Glue Bottle
Fondant covered cake

For centres, use #9 ball of black CC gum paste & 20g wire - create a hook on the wire, dip in glue & wipe off excess, secure ball of paste to wire by inserting hooked end into paste 

Pinch a star like pattern on top of ball of paste using tweezers.  Apply glue to pinched areas and dip into a mixture of gelatine and red velvet dust to create pollen centre.

Tape bundles of stamens around the dried centre - it's easier to control smaller bundles at a time rather than the entire amount.  When all taped, trim off excess at base to avoid build up and tape to completely encase stamens and wire.

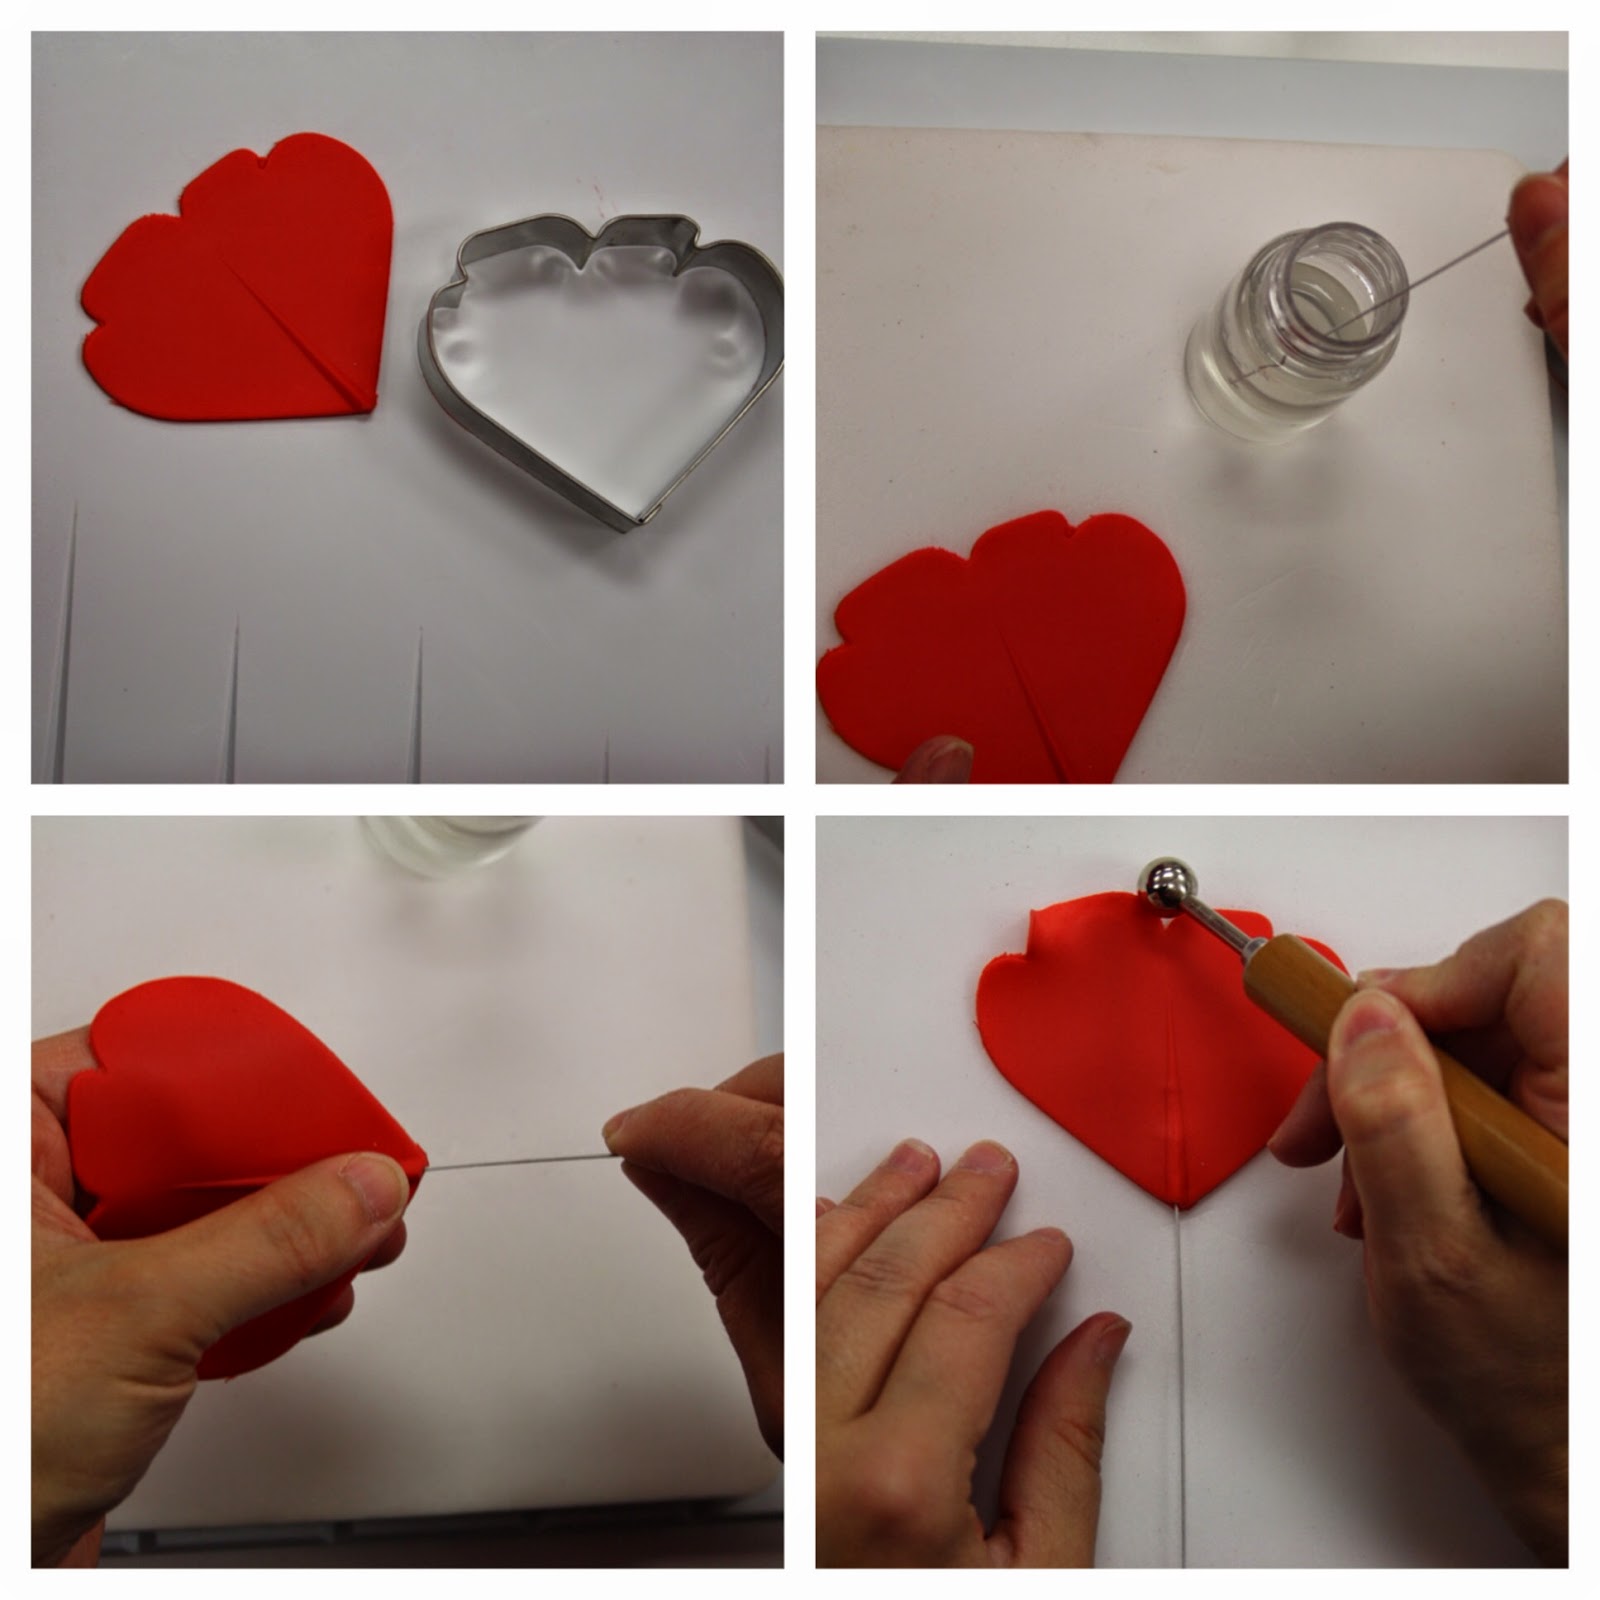
Roll out a sausage of Red CC gumpaste and place along grooves of the groove board.  Roll out until it's thin, then flip over and cut out petals ensuring that the groove is 1/2 - 2/3 up the centre of the petal. You will need 4-6 petals per flower depending upon the variety of poppy you are creating. 

Using 24g white wire, dip wire in glue, wipe off excess and insert into petal 1/3 of the way in. Thin edges on foam pad with a ball tool.

Place wired petal on one side of corn husk veiner, place other side on top and sandwich together, pressing firmly to get impression.  Remove from veiner, place on foam pad and go over edges with ball tool to ruffle.  Place petals in flower former to dry.

Using floral tape, tape dried petals tightly around centres.  Adjust petals as you go to create the look you want.

Using petal dusts - colour petals front & back paying attention to highlights and shadows.  Steam flower to set colours when done colouring.

Left: dusted & steamed completed flower.  Right: un-dusted flower


Modern Mother's Day Cake

Wednesday, July 24, 2013

Baking with Buttermilk


photo credit: Jason Chow Photography

For most of my cakes, I prefer baking with buttermilk over milk - I love the texture and taste buttermilk gives to a cake.  However, although I love buttermilk, I don't often love shopping for it.  
At most grocery stores, it's only available in 1L cartons - and sometimes you find it, sometimes you don't, sometimes it has a long expiration date, sometimes a week or less!  It can become quite a nuisance when you bake to order and you suddenly get a last minute request but you are out of buttermilk, or you buy more than you need and end up tossing out half the container because it goes past due.  Yes you can freeze buttermilk - best to do it in small amounts which can thaw easily, but again that's a nuisance.

Recently we brought in dry buttermilk powder - all the essence and qualities of buttermilk but in dry form just waiting to be reconstituted.  Now I have buttermilk on hand whenever I need it - I can make a little or a lot depending upon my needs - no waste! And this is true buttermilk like the product from days gone by - it is the residue left over from making sweet cream butter, and then dried into powdered form.  Today's commercial buttermilk is cultured, i.e.: it is milk with an addition to it to create a buttermilk taste & texture.  For more info about buttermilk, see this Wikipedia post. 

So what can you use buttermilk for? It is excellent in baked goods; from muffins, to quick breads, to cakes - it gives an amazing texture & flavour to your baked items.  Here's a quick non-cake related recipe in which buttermilk is the star - Irish Soda Bread.  This bread is VERY easy to make, takes less than 5 minutes to prepare, can be on the table in 45 minutes, tastes amazing and has 4 simple ingredients!  It's homemade and your family will think you hit a home run!  Try it!


Irish Soda Bread
adapted from finecooking.com 


Ingredients:

3 1/2 cups all purpose flour
3/4 tsp baking soda
1 tsp salt
1 1/2 - 1 3/4 cups buttermilk

To make 2 cups of buttermilk: 
Mix together 6 1/2 tbsp (62.5g) buttermilk powder with 450mL water


Yields:
One amazingly delicious 6"-7" round loaf


Serves: 
1-8 depending! :)

Using the centre rack of the oven, pre-heat the oven to 450F and lightly flour a rimmed baking sheet. 

In a large mixing bowl, sift together all your dry ingredients.  Make a well in the centre of your flour mixture and pour in 1 1/2 cups of buttermilk.  Using one hand, stir together, incorporating all the ingredients.  If too dry, add additional buttermilk 1 tbsp at a time until the dough just comes together.  This dough is soft, do not overwork the dough.

Turn the dough onto a floured surface, gently knead together and shape into a round about 6"-7" in diameter and 1 1/2" high at the centre point.  Flip the bread round over so that the floured side is face up.  With a sharp knife, score a cross in the dough - from one side to the other about 1/4" deep.

Place dough on the baking sheet and bake for 15 minutes.  After 15 minutes, lower the temperature to 400F and bake until bread is golden brown and sounds hollow when you tap on the bottom - approximately 20-30 minutes. 

Best if allowed to cool for approximately 2 hours prior to slicing and serving .... if you can wait that long!

Get creative: add raisins, herbs, chopped chocolate, caramelized onions, currants, dried cherries, crystallized ginger, olives - experiment & have fun!

Tuesday, November 20, 2012

Starburst Cake Design Tutorial


Today I was happy to be a part of CakeFu Masters and I offered a training on this cute cake & flower. If you missed out on my Cake Fu tutorial from November 20th, don't fret! Here is the step by step pictorial for you all to enjoy!

From my new line of cutters Flourishes,  I came up with this cute cake design & paper inspired flower using my Starburst cutter set.


 You can create this cake in any colour combination you wish, using any fondant you like.  For this project I wanted a pink & grey colour scheme, so I used white Fondx with a touch of Jet Black Elite to give me a light grey colour. You will also need gumpaste, I used Confectioners Choice white gumpaste. 


First you will need to cover your cakes.  For this project I was using round cake dummies - 5"x4" round and 6"x5" round.


Here are the tools I used in this project: fondant smoothers, sharp top edger, rolling pin, sharp knife, paint brush, palette knife, gum glue in bottle, CMC (to make glue), clear piping gel, square cutter (largest in set of 3), starburst cutter set.


First we will make the flower.  Here is a picture of what you will need to make the flower as well as the completed flower.


Roll out your gumpaste - at first using the small rolling pin, then once thin enough you can run it through the pasta machine - on mine I went to setting #4


Next you will need to attach the edible image paper.  For this project I used a paper from Lucks, but you can also print your own or use another design or brand.


To attach the paper to the gumpaste, lightly moisten the surface with either water, or here I used edible gum glue - do not over moisten, just enough for the paper to stick.  Carefully attach the paper and make sure it is secure and without air bubbles.


Next you will want to cut out all the Starburst shapes.  For this flower you will need: 21 large triangles - 3 sets of 7 pairs and 14 small triangles - 2 sets of 7 matching pairs.  These cutters are designed like puzzle pieces and fit against one another.  They are also double sided meaning you can cut a mirror image of each shape.


When cutting, try to use your paste in the most efficient manner possible to avoid waste.  See here how I've cut the shapes and paired them up as I go to make sure I have enough.  I'm also maximizing my paste by cutting the shapes close together. Be sure to trim away any jagged pieces if you get them. Tip to avoid that: keep your cutter edge clean.


You can assemble the flower once all the pieces have been cut.  It works best if the paste is slightly dry.  Make sure you have cut the gumpaste square and that it is also somewhat dry.  Add gum glue (not too much) to entire square surface.


Stage 1: Starting with the large pairs of triangles, arrange them on the square working all the way around like a star shape.


Keep working all the way around the square - I went in a counter clockwise fashion, but you can also go clockwise! ;) Just make sure to place each pair tightly against each other.


Here is stage 1 complete - a star shape which you can stop here or go on to the next stage.


Stage 2: Using the last 7 large triangles, arrange standing upright all around star at mid point of each point.

To attach: use clear piping gel painted on with paintbrush along bottom edge.


Here is a detail shot of where to paint piping gel.


When placing the pieces, be sure to have the pattern side all facing in the same direction.


Here is stage 2 completed - again note the pattern side all faces the same direction.


Stage 3: With the small triangle pairs (looks like a kite) paint 2 edges (bottom edge and top side which will attach) with piping gel and secure as a pair in between each standing piece.


Here is a detail shot of placement


Continue all the way around the star adjusting as you need until all spaces are filled.


Here is the completed flower.  Allow flower to dry before placing on cake.  To secure flower to the cake side, I used melted coating chocolate as it sets up quickly and securely.


Side pattern design: You can use the shapes to create a multitude of pattern designs.  You can space them out as I did by eye, or you can do the math and work it all out!  For me, I cut out enough triangles to go around the diameter of my cake and place them all around the cake laying on the board, spacing them out as I go.  Once I like the spacing, I will attach the shapes to the side of the cake using gum glue.


From rolled piece of gumpaste - cut out shapes as many as you require to complete your design.  Practice different configurations on a flat surface or the counter prior to attaching to the cake.


Here is the start of my chosen pattern.  For this pattern I needed 2 matching sets of the large triangles and 4 matching sets of the small triangles.


Continue the design up one full side of the cake so you can see your spacing and configuration.  Then work your way around the cake to fill in the entire design.


When using the gum glue, you do have a bit of time to adjust the pieces if required.  Instead of using your fingers to move the shapes around, try using the small palette knife or better a pair of them.  The straight edge will reduce the risk of distorting the shape.


Use your fettuccine attachment to cut the bands of gumpaste for your border.  Roll a long strip of gumpaste to setting #4, then move over to the fettuccine attachment and pass through to cut.


After rolling through the fettuccine attachment you end up with all these strips!  Perfect for borders, shoe laces, curly cues or fill on a wine crate cake!


Create a "common cut" - overlap the band and with a sharp knife cut through both layers - creates a perfect join which is practically seamless! Be sure to remove the underneath excess!


The finished cake design


Close up detail of the flower


Close up detail of the pattern


I hope you all enjoyed this mini tutorial!

Lisa